Trick or Trace
Halloween poster time. You start with a photograph of a pumpkin and turn it into a bold vector stencil with Image Trace. You clean the stencil, put it on a night sky with a moon and a short title, and turn in a midpoint. Then you light the scene: a Radial gradient and the Screen blend mode give the moon a soft glow, and a Freeform gradient shades the pumpkin so it looks round and moonlit. Finally you export an orange poster, change six swatches, and export the same poster in Ghost Blue.
A good stencil reads from across the room. You are tracing the shape of the pumpkin, not every wrinkle in the photo.
Shortcuts are written Windows / Mac. Example: Ctrl+B / Cmd+B. On a Mac, Option is the key some Windows lists call Alt.
We build together. Follow along step by step. When you finish a step early, wait at the check line or try the bonus at the bottom. Use Illustrator only. Your poster must be original: no movie, game, or brand designs.
What you turn in
- Midpoint (Step 5):
LastName_TrickOrTrace_Midpoint.jpg: the cleaned pumpkin stencil on the Night background, with the frame, the moon, and both lines of type. No glow yet. - Final (Step 7):
LastName_TrickOrTrace_Orange.jpgandLastName_TrickOrTrace_GhostBlue.jpg: the same poster with the moon glow, in two palettes. If the instructor calls the one-colorway cut, turn in Orange only. - Keep your
LastName_TrickOrTrace.aifile for yourself. Do not upload it.
Downloads
TrickOrTrace_StudentFiles.zip: today's files. Unzip it before Step 1.Pumpkin_Class_Pexels_673073.jpg: inside the zip, in the Starter folder. A 1920 by 1277 px photo by Miguel Á. Padriñán on Pexels. One pumpkin, a tall stem, a gray background, and a shadow on the floor. The background and the shadow are not part of your stencil.TrickOrTrace_Orange.ase: inside the zip, in the Palette folder. It holds all seven named swatches for the working poster. In Step 7 you edit these swatches to the Ghost Blue values in the table below.Bat_Fallback.svg: inside the zip, in the Bonus folder. Only needed for the bonus bat brush.
What we build today
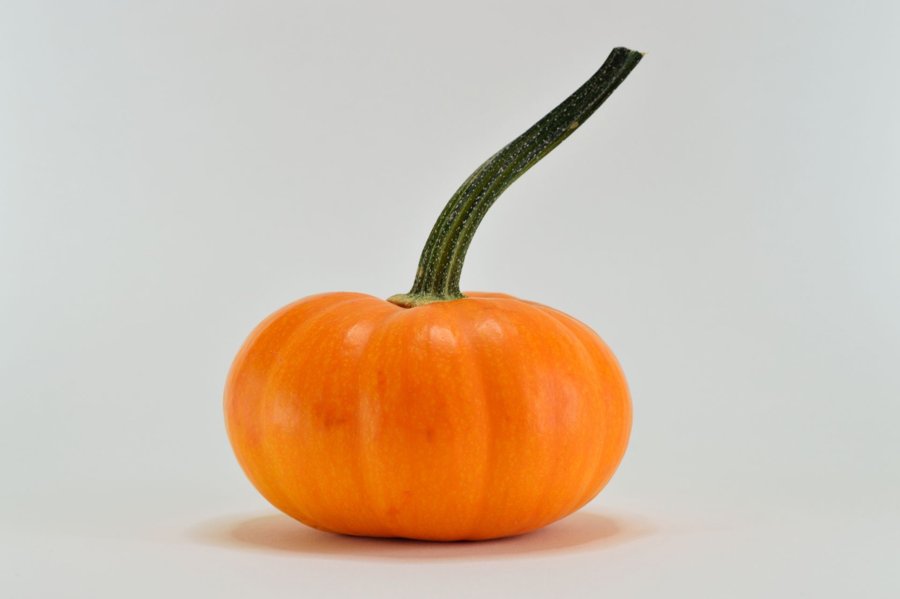
Start: the photo
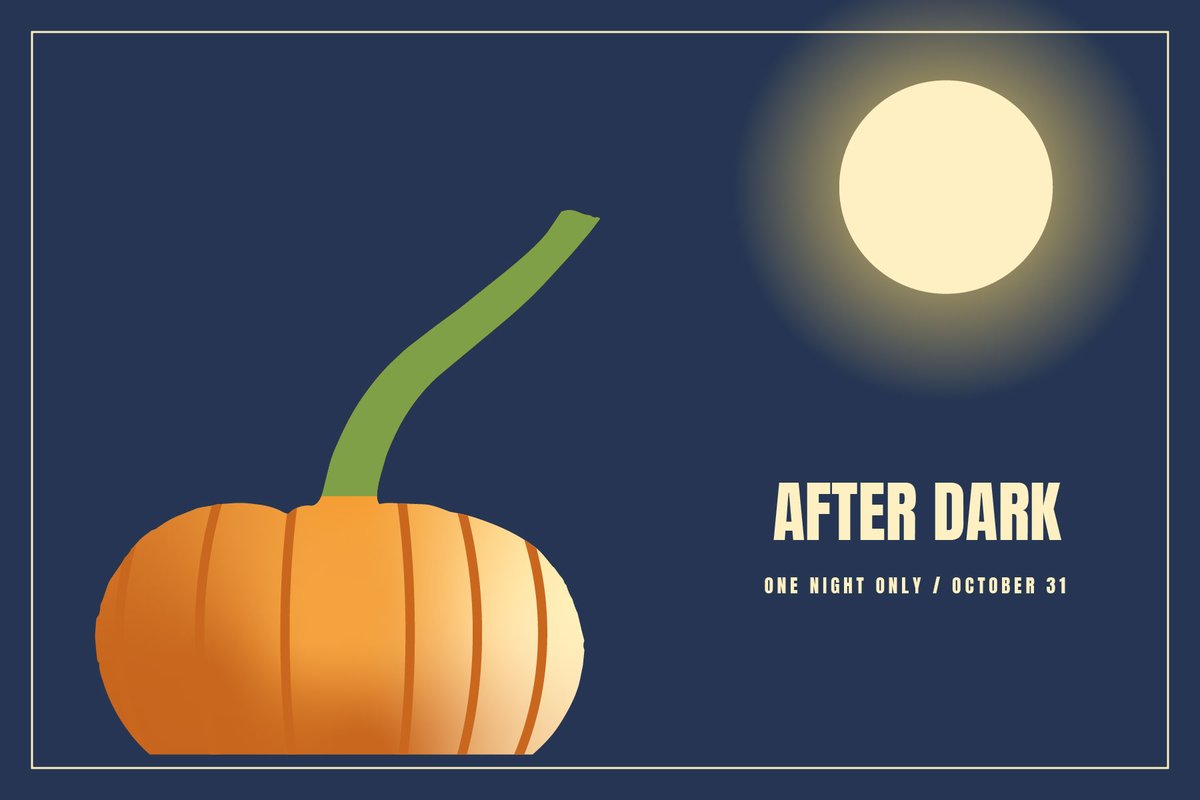
Finish: the poster
What your files should look like
These are finished examples made in Illustrator by following this walkthrough. Your pumpkin's edge, your title, and your glow will not match exactly, and that is fine.
Orange final
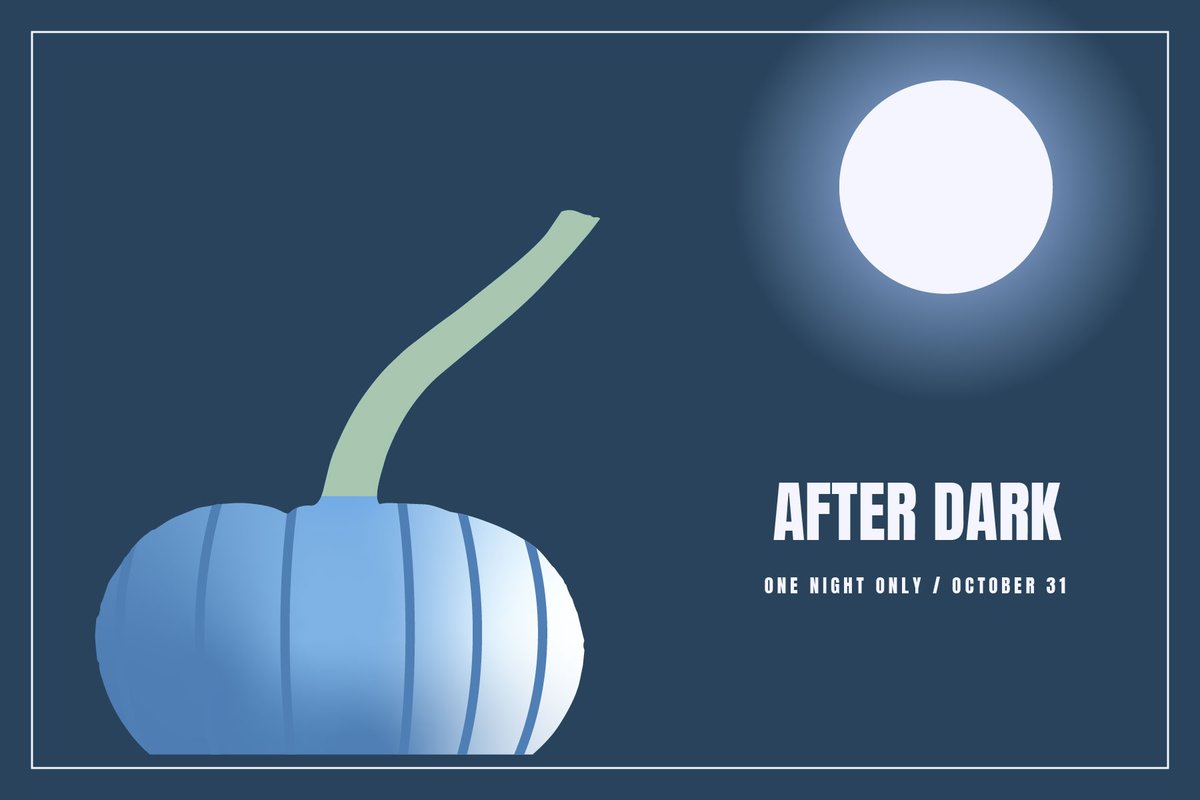
Ghost Blue final
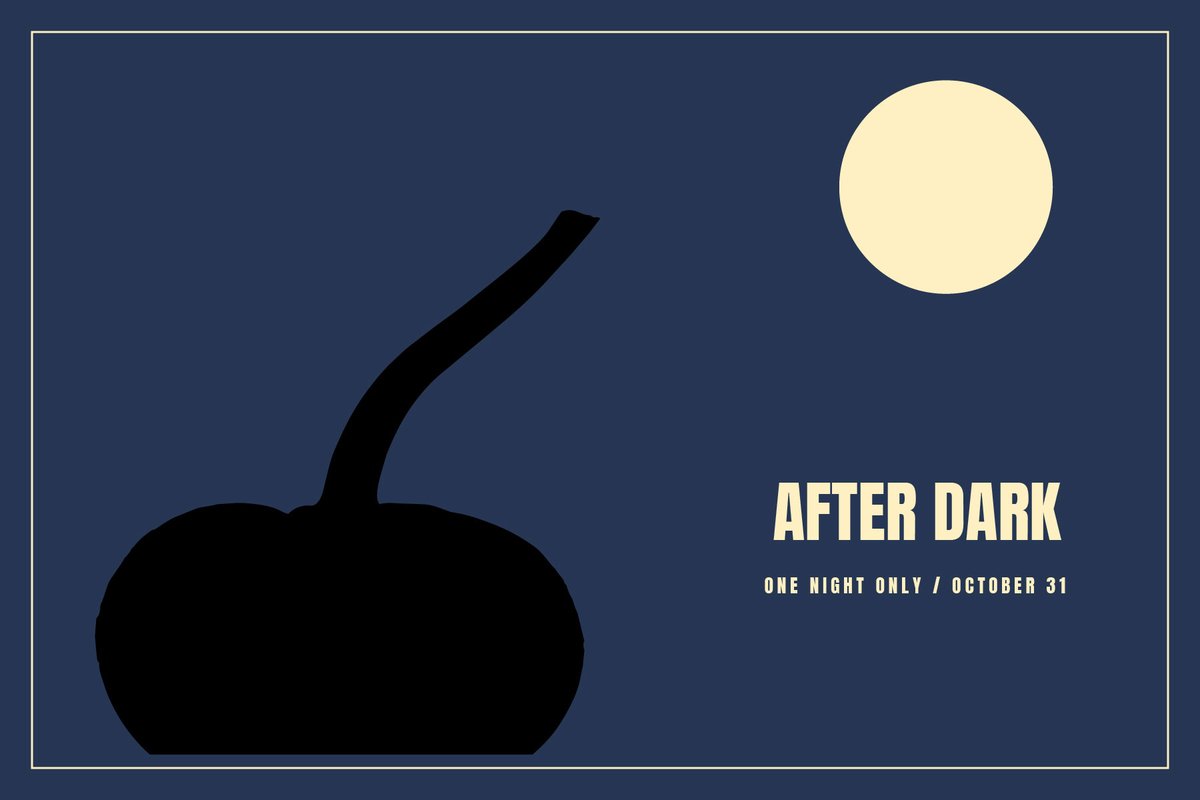
Midpoint
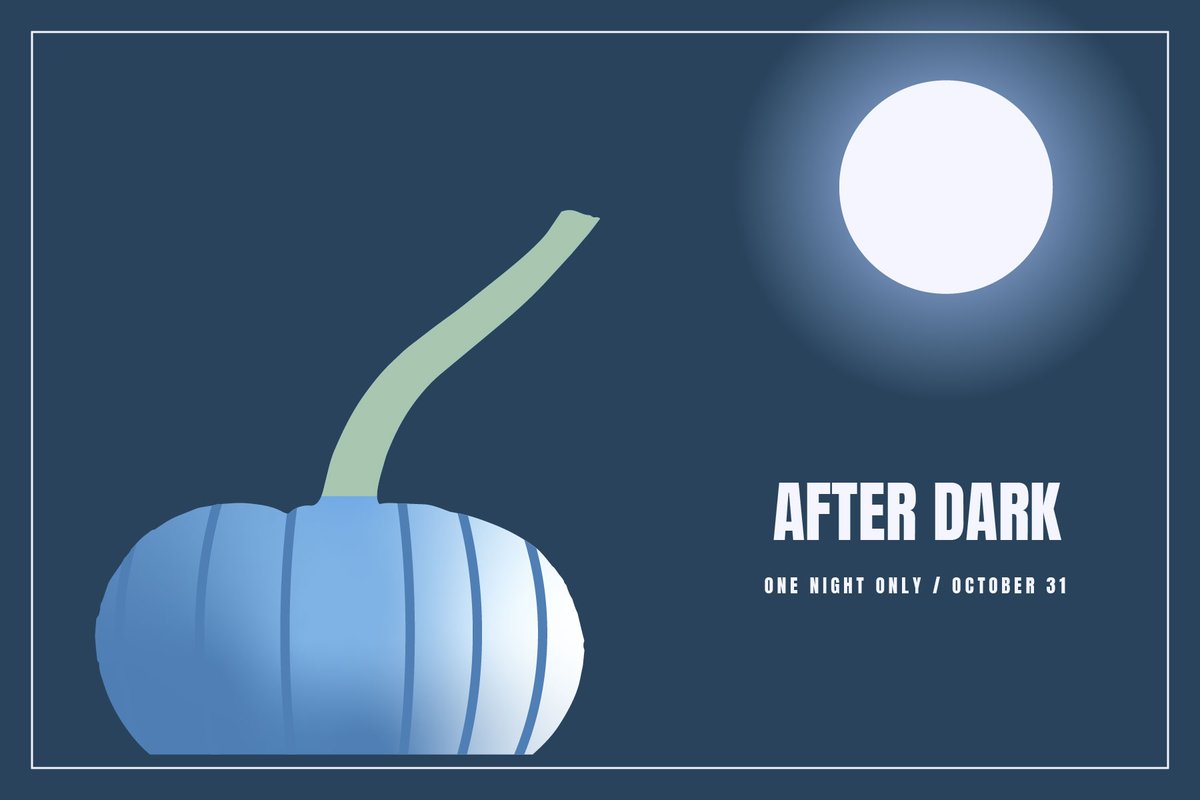
With the optional layers
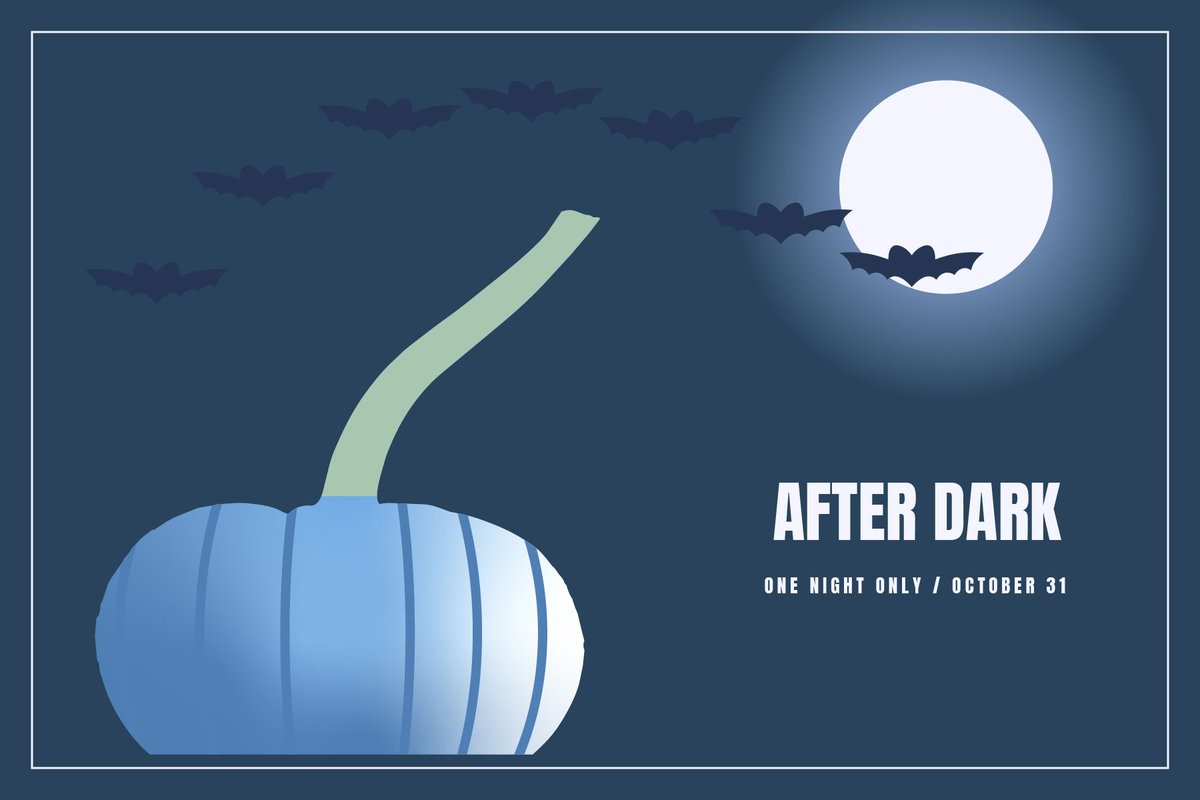
With the bonus bats
The class palette
The Orange ASE file contains all seven named colors: six core colors and one optional Stem color. Load it in Step 1 and make sure the swatches are global. Always apply a color by clicking its named swatch in the Swatches panel. Do not type the hex code on individual objects. That link is what lets one swatch edit recolor the whole poster in Step 7. Step 7 gives you the Ghost Blue values to type in.
| Swatch | Orange version | Ghost Blue version | Used on | ||
|---|---|---|---|---|---|
| Night | #263653 | #29435C | Background | ||
| Moon | #FFF0C2 | #F4F5FF | Moon and title | ||
| Pumpkin | #F4A340 | #7FB2E5 | Traced pumpkin | ||
| Glow | #F8D46B | #A9C9FF | Bright center of the moon glow | ||
| Pumpkin Light | #FFD99A | #DDEFFC | Moon-facing side of the pumpkin (Freeform) | ||
| Pumpkin Shade | #C9671E | #4F7FB5 | Shadow side of the pumpkin (Freeform), optional rib lines | ||
| Stem | #7FA046 | #A8C6B0 | Optional stem | ||
Quick refresher: Photoshop to Illustrator
| Photoshop | Illustrator |
|---|---|
| Threshold adjustment: every pixel turns black or white | Image Trace in Black and White mode does the same, then draws vector paths around the black. |
| Layer blend mode menu in the Layers panel | Blend modes live in . Screen works the same way: it can only lighten. |
| Gradient tool, linear or radial | Same Linear and Radial types, plus Freeform: you click color points anywhere inside a shape, and the colors blend between them. Radial is for even light from a center. Freeform is for uneven light on an irregular shape. |
| Changing a Solid Color fill layer updates the fill | Editing a global swatch updates every object that uses it, all at once. |
| Lock icon in the Layers panel | , Ctrl+2 / Cmd+2. Unlock all with Ctrl+Alt+2 / Cmd+Option+2. |
Class plan
| Start | Minutes | What | How |
|---|---|---|---|
| 0:00 | 2 | Opening: the photo and the target poster | Demo |
| 0:02 | 6 | Step 1: Start the poster and load swatches | Do along |
| 0:08 | 11 | Step 2: Trace the pumpkin | Do along |
| 0:19 | 9 | Step 3: Expand and clean the stencil | Do along |
| 0:28 | 9 | Step 4: Build the poster | Do along |
| 0:37 | 3 | Step 5: Midpoint turn-in | Gate |
| 0:40 | 10 | Step 6: Light the scene: Radial glow and Freeform pumpkin | Do along |
| 0:50 | 10 | Step 7: Export Orange, recolor, export Ghost Blue | Turn-in |
| 1:00 | Core ends. Midpoint and both finals turned in. | ||
| 1:00 | 8 | Step 8: Bonus bat Scatter brush | Bonus, ahead students only |
If you fall behind
- Not expanded by 0:25? Raise your hand so the instructor can help you finish the trace and cleanup. Keep working from the supplied photo.
- One-colorway cut: if the class is behind at 0:50, the instructor may call it. Finish the glow, export Orange, and skip Ghost Blue. Never skip the glow or Screen.
Steps
Start the poster and load swatches
about 6 min- Unzip
TrickOrTrace_StudentFiles.zip. In Illustrator, choose . Make one artboard, Width1800 px, Height1200 px, Color Mode RGB. Click Create. - Choose . Name the file
LastName_TrickOrTrace.ai, format Adobe Illustrator (ai). Click Save, then OK in the options box. - Open . From the Swatches panel menu, choose Open Swatch Library > Other Library (or ). Open
Palette/TrickOrTrace_Orange.asefrom the unzipped files. - In the Orange library, add Night, Moon, Pumpkin, Glow, Pumpkin Light, and Pumpkin Shade to your document Swatches panel. You can drag each swatch into the document panel. Stem can stay in the library until you try the optional layers.
- Inspect the six document swatches. A global swatch shows a small white triangle in its bottom right corner. If one has no triangle, double-click it, check Global, and click OK.
If not: To see swatch names, open the Swatches panel menu (four lines, top right) and choose Small List View.
- No white triangle means no link. A swatch without it will not recolor in Step 7.
Trace the pumpkin, not the photographic detail
about 11 min- Choose , pick
Pumpkin_Class_Pexels_673073.jpgfrom the Starter folder, and click once on the artboard. The photo is bigger than the artboard and hangs off the edge. That is expected. You scale the pumpkin later. Keep the photo selected. - Open . Set Mode to Black and White and check Preview. Wait for the preview to draw.
- Look at the preview at the default Threshold (
128). At the bottom of the panel, read the Paths count. This is what an untuned trace looks like. - Now tune it. Type Threshold
175. Click the arrow next to Advanced and type Paths20%, Corners30%, and Noise50 px. Wait for the preview to update. - Zoom out until the whole pumpkin fits on screen. Check the outside edge and the spot where the stem meets the body. They should be one connected dark shape on white.
- The floor shadow joins the bottom of the pumpkin. That is expected. You trim it in Step 3.
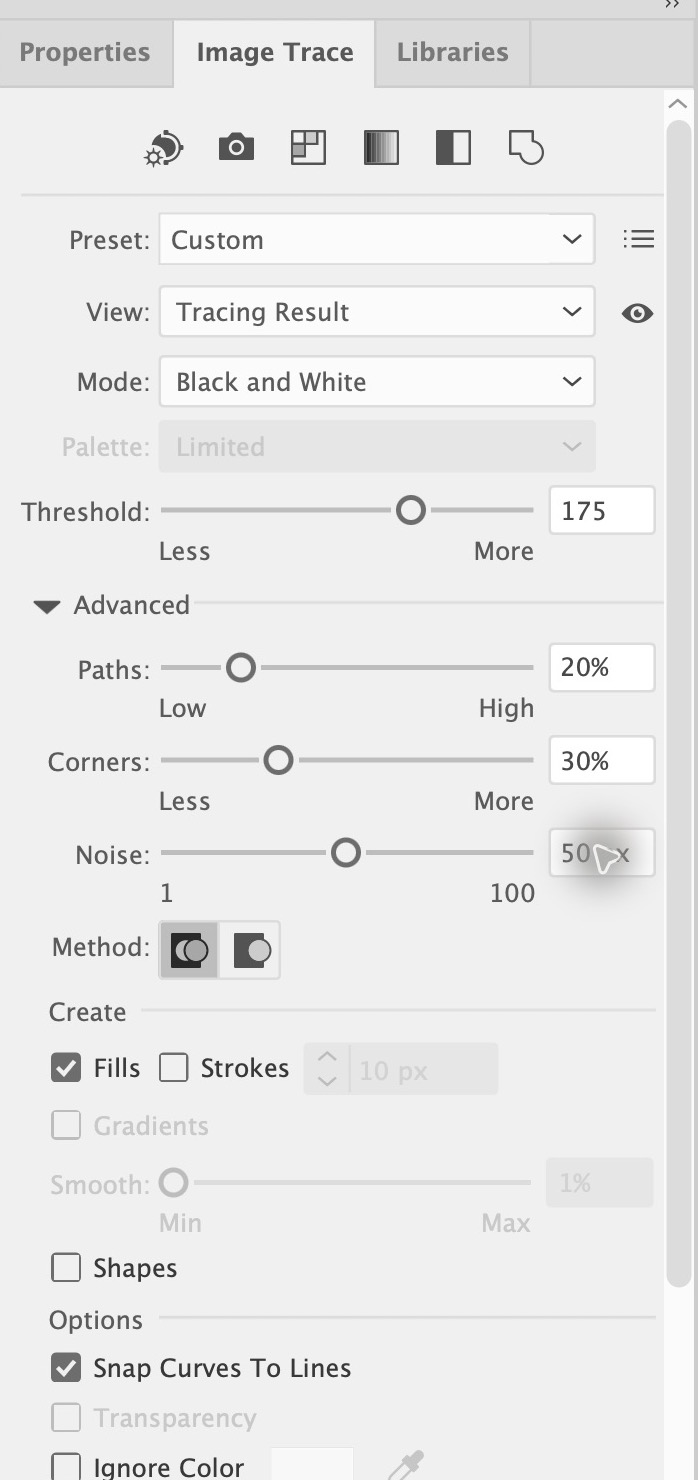
If not: If the stem breaks away from the body, raise Threshold in steps of 5. If the gray background starts turning black, lower it in steps of 5. Compare at the same zoom each time.
- Do not click Expand until the preview looks right. After Expand, the Threshold slider is gone for good.
- Threshold decides what turns black. Paths, Corners, and Noise decide how detailed the outline is.
Expand and clean the stencil
about 9 min- With the trace selected, click Expand in the Properties panel, or choose . The preview becomes editable paths. Undo if you want to go back and retune.
- Ungroup with Ctrl+Shift+G / Cmd+Shift+G.
- Click the gray area outside the artboard so nothing is selected. Then press
Vand click the white part of the trace. Only the white shape should highlight. Press Delete. If the pumpkin highlights too, do not delete: click the gray area and try again. - Press
Mfor the Rectangle tool. Draw a wide rectangle over the shadow strip, with its top edge where you want the pumpkin's flat bottom. Make it wider than the shadow on both sides. - Press
V. Shift-click the pumpkin so both the rectangle and pumpkin are selected. Open and click Minus Front (the second button in the top row). The shadow and the bottom sliver of pumpkin disappear. If it cut too much, Undo and draw the rectangle lower. - If a piece of shadow still sticks out to the side, draw a small rectangle over just that piece and use Minus Front again.
- Delete any small stray pieces. If the stem and body are separate shapes, select only those two and click Unite (the first Pathfinder button).
- Select the pumpkin and click the Pumpkin swatch. Save with Ctrl+S / Cmd+S.
If not: If you deleted the pumpkin, Undo. If you cannot select the white shape, Ungroup once more and try again. If Minus Front did nothing, check that both shapes were selected and the rectangle was on top.
- The flat bottom is on purpose. It is a graphic choice, like the base of a sticker.
- Expand turns a trace into paths. After that, it behaves like any shape you drew.
Build the poster
about 9 min- Press
Mand draw a rectangle that goes past all four edges of the artboard. Click the Night swatch for the fill and set the stroke to None. Choose . - With the rectangle still selected, lock it: Ctrl+2 / Cmd+2. Now you cannot grab it by accident.
- Frame. Press
M, click once on the artboard, and type Width1704 px, Height1104 px. Click OK. Set the fill to None, click the Stroke square, click the Moon swatch, and set the stroke weight to3 pt. In the Align section of the Properties panel, click Horizontal Align Center and Vertical Align Center. With one object selected, Illustrator centers it on the artboard, so the frame sits 48 px inside every edge. If it does not move, open the Align menu in that section and choose Align to Artboard, then click the two buttons again. - Press
Vand click the pumpkin. Hold Shift and drag a corner handle to scale it. Place it low on the left, big enough to feel heavy, with its flat base just above the bottom of the frame. - Press
Lfor the Ellipse tool. Click once in the upper right of the artboard and type Width320 px, Height320 px. Click OK. Click the Moon swatch for the fill and set the stroke to None. Leave clear space between the moon and the pumpkin. - Press
T, click in an open area, and type a short original title, such asAFTER DARK. PressV, then click the Moon swatch. Pick a plain, bold font and make it big enough to read zoomed out. - Add a small second line under the title. Press
T, click below the title, and type a short all-caps line, such asONE NIGHT ONLY / OCTOBER 30. Apply the Moon swatch and set the size to about28 pt. Open and set Tracking to200. Line up its left edge with the title's left edge. Keep both lines plain: no effects. - Save with Ctrl+S / Cmd+S.
If not: If the background covers everything, it is locked in front. Unlock all with Ctrl+Alt+2 / Cmd+Option+2, choose , and lock it again.
- The poster works without a carved face. A strong silhouette is enough.
- A big title plus a small, widely spaced line is the simplest type hierarchy there is. It is most of what makes a layout look professional.
Midpoint turn-in
about 3 minturn-in- Save with Ctrl+S / Cmd+S.
- Choose . Name the file
LastName_TrickOrTrace_Midpoint.jpg. Set the format to JPEG, check Use Artboards, and leave Suffix unchecked if your dialog shows it. Click Export. - In the JPEG Options box, set Quality near the high end, Color Model to RGB, and Resolution to Screen (72 ppi). Click OK. Do not choose High (300 ppi): your file would come out four times too big.
- Open the JPEG and look at the whole image. Then upload
LastName_TrickOrTrace_Midpoint.jpgto Canvas as your midpoint.
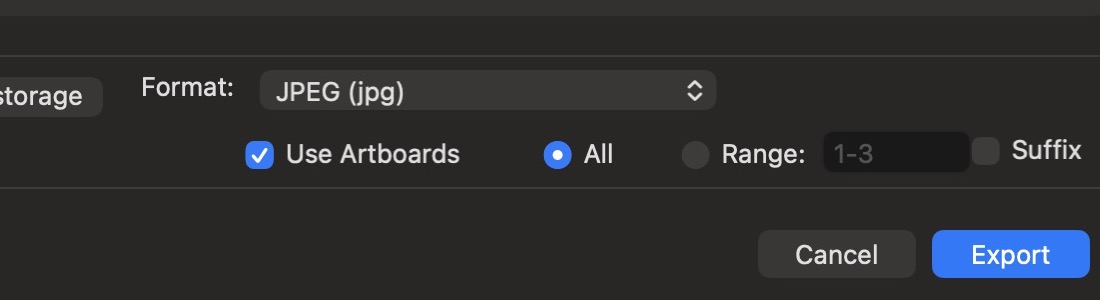
If not: If the file name ends in
-01, rename it to match before you upload. If art is cut off, export again with Use Artboards checked.- You keep building in the same .ai file. The JPEG is only a snapshot.
Light the scene: Radial glow and Freeform pumpkin
about 10 minTwo gradients, two jobs. A Radial gradient makes even light that spreads from a center, which is what a glowing moon does. A Freeform gradient lets you place colors anywhere on an irregular shape, which is what moonlight on a pumpkin does.
Part A: Radial glow on the moon
- Press
Vand click only the moon. Copy with Ctrl+C / Cmd+C, then choose , Ctrl+B / Cmd+B. A copy lands right behind the moon, already selected. This copy is the halo. - Choose . Select Uniform, type
200%, and click OK. The halo grows from its own center to twice the moon's size and stays lined up behind it. - Open . With the halo selected, click the Radial Gradient button (the second gradient type). The halo fills with a white-to-black gradient.
- Under the gradient slider, double-click the left color stop. In the popup, click the Swatches button and choose Glow. Double-click the right stop, choose Glow too, then set that stop's Opacity to
0%. The glow now fades out before the edge. - Open . With only the halo selected, change the blend mode from Normal to Screen. Click the moon and check that it is still on Normal.
Part B: Freeform shading on the pumpkin
First, know the panel. With a Freeform gradient selected, the Gradient panel shows these controls:
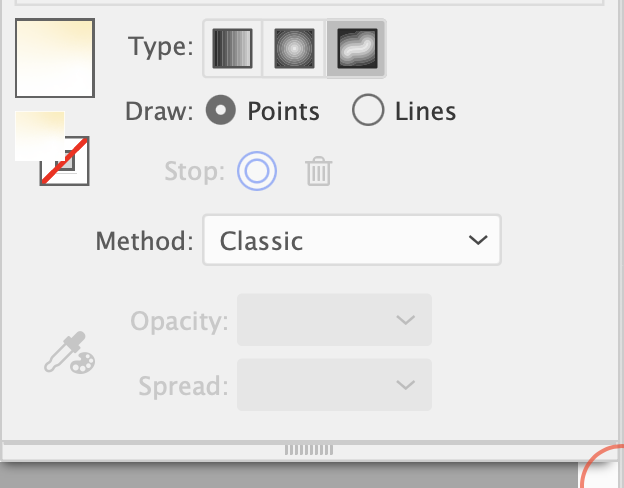
| Control | What it does | Today |
|---|---|---|
| Type | Linear, Radial, or Freeform. The third button is Freeform. | Freeform |
| Draw: Points | You place separate color points, and the colors blend between them. | Use this |
| Draw: Lines | You draw a path of points, and color flows along the line. | Not today |
| Stop | Shows the point you have selected. The trash can deletes it. | Use to delete points |
| Method | How the colors blend. Classic is the standard blend; Smooth blends more gradually. | Leave on Classic |
| Color button (eyedropper and palette, left side) | With a point selected, opens the colors so you can pick a swatch for that point. | Pick swatches here |
| Opacity | How see-through the selected point's color is. | 100% on every pumpkin point |
| Spread | How far the selected point's color reaches before it starts blending. Higher spreads the color wider. | Values in the table below |
- Press
Vand click the pumpkin. In the Gradient panel, click the Freeform Type button and make sure Draw is set to Points. Illustrator adds a few points on its own. Each point is a small circle on the pumpkin. - Clear the automatic points. Click a point to select it, then click the trash can next to Stop (or press Delete). Repeat until one point is left. You will reuse it as point 2.
- Build the four points in the table below. Match the picture.
- To add a point: click an empty spot inside the pumpkin.
- To color a point: select it, click the color button in the Gradient panel (or double-click the point), and pick the swatch from the Swatches list. Always pick the named swatch, so it recolors in Step 7.
- To move a point: drag it.
- To set Opacity and Spread: select the point and type the values in the panel.
Point Where Swatch Opacity Spread 1 Upper right of the body, the side facing the moon Pumpkin Light 100%40%2 Middle of the body Pumpkin 100%60%3 Lower left, near the edge Pumpkin Shade 100%30%4 Bottom edge, a little right of center Pumpkin Shade 100%30%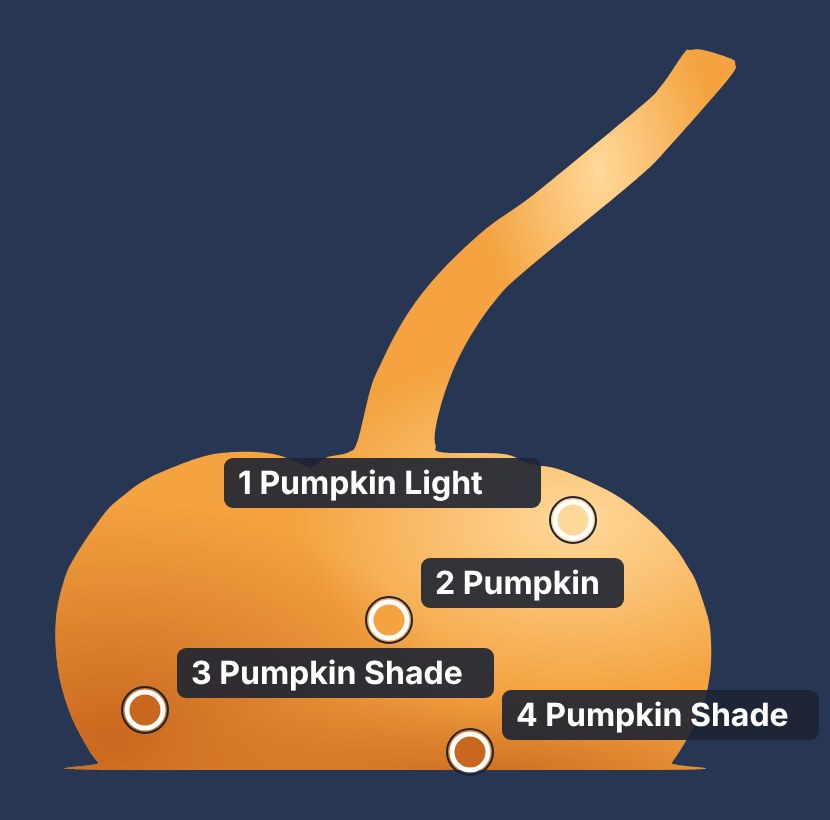
Where the four points go. Drawn by a script as a guide; your blend will look slightly different. - Zoom out and judge it. The Spread values are a starting point. If the light patch is too small, raise point 1's Spread. If the bottom is too dark, lower the Shade points' Spread or move them toward the edge. The stem picks up the nearest colors. That is fine.
- Save with Ctrl+S / Cmd+S.
If not: If the halo has a hard edge, check that the right stop is at 0% Opacity. If the pumpkin looks blotchy, you probably have extra points: count them, keep four, and delete the rest. If it is still one flat color, its points all use the same swatch: select each one and pick the swatch from the table.
- Screen can only lighten. Over a dark sky, that reads as light. You use blend modes again for mockups in Session 6.
- Light comes from one direction. Put the light point on the side facing the moon and the shade points on the opposite side, and the shading will feel believable.
Optional before the final exports: stem and rib lines about 6 min
Only if you finished Step 6 early. If you are on pace, go straight to Step 7.
What you are making: six thin rib lines and a green stem, drawn on top of your shaded pumpkin. The shading stays visible underneath. The picture shows the four moves.
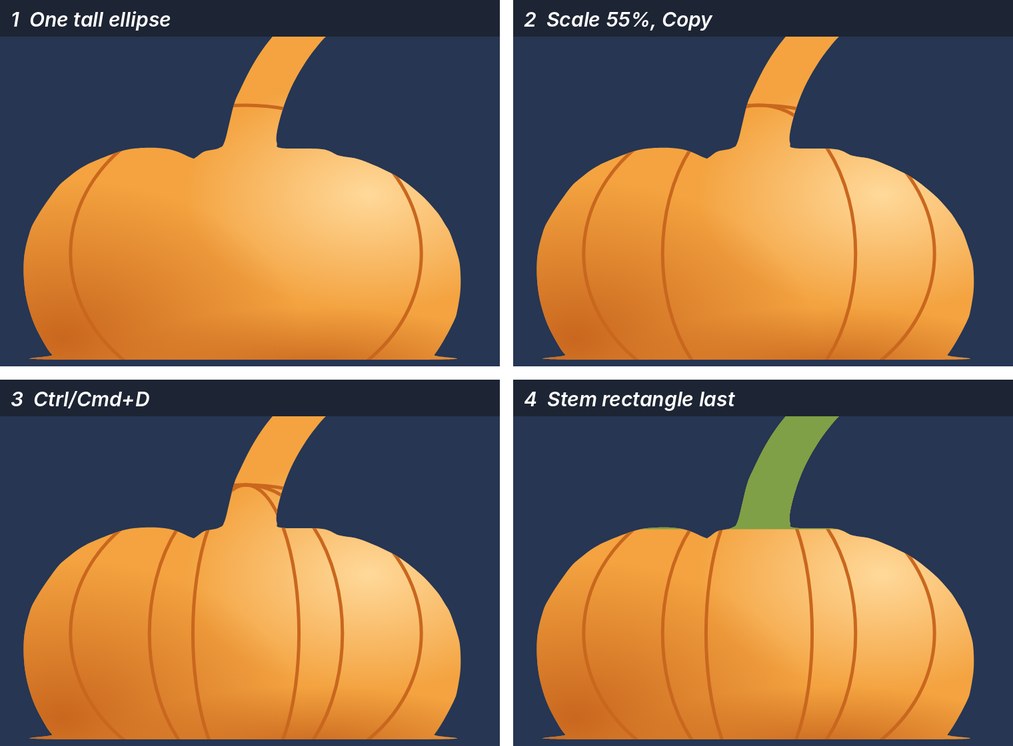
Two habits for this whole section:
- Set colors in the Swatches panel (). Click the Fill or Stroke square at its top left first, then click a swatch. The None swatch is white with a red slash.
- Press
Vbefore you click empty space. Clicking the canvas with the Ellipse or Rectangle tool opens a size box instead of deselecting. If that box appears, click Cancel.
Part 1: Set up
- Add the Stem swatch
#7FA046from the Orange library to your document Swatches panel. Check that it shows the white Global triangle. - Make a copy of the pumpkin to draw into. Press
Vand click the pumpkin. Copy with Ctrl+C / Cmd+C, then choose , Ctrl+F / Cmd+F. The copy lands exactly on top and stays selected. - Turn on Draw Inside. With the copy still selected, press Shift+D until dashed corner brackets appear around the pumpkin. (The mode buttons are the three small circles near the bottom of the Toolbar; Draw Inside is the third.) From now on, anything you draw is trimmed to the pumpkin's outline.
Why a copy? Draw Inside removes the fill from the shape you draw into. Using a copy means the copy goes blank, and your shaded pumpkin underneath still shows.
Part 2: Ribs
- Draw one tall ellipse. Press
L. Point at the middle of the pumpkin body (straight below the stem, halfway down). Hold Alt (Windows) or Option (Mac) and drag outward. Stop when the ellipse is:- a little narrower than the body, with its sides just inside the left and right edges, and
- taller than the body, with its top above the body and its bottom below the base.
- Fix its colors right away. A new ellipse starts with a white fill that hides your shading. With the ellipse still selected, in the Swatches panel:
- Fill square, then None
- Stroke square, then Pumpkin Shade
- Stroke weight
3 pt(in the Properties panel)
- Make a narrower copy. Choose . It may still show Uniform 200% from the halo. Set:
- Non-Uniform
- Horizontal
55% - Vertical
100%
- Make one more. Press Ctrl+D / Cmd+D once. That repeats the last scale and copy. You now have three ellipses and six rib lines. Stop there.
Part 3: Stem
- Draw the stem rectangle last. Press
M. Drag a rectangle that covers the whole stem with room to spare: start above and left of the stem tip, end past the stem's right side, and put the bottom edge where the stem meets the body. Any part of the stem the rectangle misses stays orange. - Color it. In the Swatches panel: Fill square, then Stem. Stroke square, then None. Because it was drawn last, it sits on top and hides the ellipse tops inside the stem.
Part 4: Finish
- Turn Draw Inside off. Press Shift+D until the first circle button (Draw Normal) is highlighted. If you skip this, the next thing you draw gets trimmed into the pumpkin.
- Press
V, click empty space, and zoom out. Save with Ctrl+S / Cmd+S.
If not: If the pumpkin turned white, gray, or muddy, an ellipse has a fill: press
A, click each rib line, and set its fill to None. If a curve shows inside the stem, the stem rectangle is not on top: select it and choose . If part of the stem is still orange, select the rectangle and drag its edge to cover the rest. If the lines look too heavy, select them and set the stroke to 2 pt.For Ghost Blue in Step 7: also change Stem to #A8C6B0. The ribs use Pumpkin Shade, so they recolor on their own. Check both JPEGs.
Export Orange, recolor, export Ghost Blue
about 10 minturn-in- Before you change any swatch, export
LastName_TrickOrTrace_Orange.jpgwith , JPEG, Use Artboards checked, and the same JPEG Options as the midpoint. - Use the palette table above to read the new values. Edit the existing document swatches so all linked objects update. In the Swatches panel, double-click Night, type
29435C, and click OK. The background changes without selecting it. Do the same for MoonF4F5FF, Pumpkin7FB2E5, GlowA9C9FF, Pumpkin LightDDEFFC, and Pumpkin Shade4F7FB5. If you added the optional stem, also change Stem toA8C6B0. - Check both gradients. If the glow or any part of the pumpkin still looks orange or yellow, select that shape and press
Gfor the Gradient tool to show its stops or points. Double-click the one that did not change and pick the matching Ghost Blue swatch. Check that the halo is still on Screen. - Export
LastName_TrickOrTrace_GhostBlue.jpgthe same way. Save the .ai file. - Open both JPEGs. Check the whole artboard, the color difference, the title, and the glow. Upload both to Canvas.
If not: If one object stayed orange, it was colored by hex code, not by the swatch. Select it, click the right swatch, and export Ghost Blue again with the same name.
- Six swatch edits (seven with the optional stem) recolored the whole poster. That is the reason to build with global swatches.
Bonus: bat Scatter brush
about 8 minbonusOnly after both final JPEGs are uploaded.
- Choose and place
Bat_Fallback.svgfrom the Bonus folder in the gray area off the artboard. Or draw your own one-piece bat silhouette. - Open . Select the bat, click the New Brush button (the plus sign), choose Scatter Brush, and click OK twice.
- Press
Bfor the Paintbrush. Paint a short curved path that crosses the moon. Make sure the new brush is the one selected in the Brushes panel. - Double-click the path's brush in the Brushes panel to open its options. Raise Spacing until the bats are separate. Try Size and Rotation if you like. Click OK and choose Apply to Strokes.
- The bats are the Night color, so they show where they cross the moon and glow. That is the look. The source bat can stay off the artboard.
- Export both final JPEGs again with the same names and upload them again.
If not: If the bats overlap into one blob, raise Spacing. If you cannot see them, paint the path across the moon, not across the sky.
- Want more? Carve a face into the pumpkin: draw eye and mouth shapes on top, select them with the pumpkin, and use Minus Front.
Final checklist
- Orange ASE loaded; four core global swatches in the document: Night, Moon, Pumpkin, Glow, each with the white corner triangle
- I tuned Image Trace before clicking Expand
- The white ground is deleted, the shadow is trimmed with Minus Front, and there are no stray pieces
- The pumpkin, background, moon, and title use the named swatches
LastName_TrickOrTrace_Midpoint.jpguploaded at the midpoint- The halo has a Radial gradient that fades to 0% at the edge, and only the halo is on Screen
- The pumpkin has a Freeform gradient: Pumpkin Light on the moon side, Pumpkin Shade at the lower left and bottom
LastName_TrickOrTrace_Orange.jpguploadedLastName_TrickOrTrace_GhostBlue.jpguploaded (unless the one-colorway cut was called)LastName_TrickOrTrace.aisaved for yourself (not uploaded)- If you did the bonus, you exported and uploaded both finals again
Troubleshooting
| Problem | Fix |
|---|---|
| The trace preview is full of speckles. | Lower Paths and Corners, or raise Noise. Judge the outside edge, not the skin. |
| The stem breaks off the body. | Raise Threshold in steps of 5 until the stem and body connect. |
| The gray background traces as black. | Lower Threshold in steps of 5. |
| The shadow is stuck to the pumpkin. | Expected. After Expand, draw a rectangle over the shadow and use Minus Front. |
| I cannot click separate pieces. | Expand first, then Ungroup with Ctrl+Shift+G / Cmd+Shift+G. |
| A big white rectangle is still there. | Click the gray area to deselect, then click the white shape and delete it. Do not delete the artboard. |
| I deleted my pumpkin. | Undo with Ctrl+Z / Cmd+Z. Deselect first, then click only the white. |
| Minus Front cut away too much pumpkin. | Undo and move the rectangle lower. |
| White shows at the edge of my JPEG. | The background rectangle does not cover the artboard. Unlock all, stretch it past every edge, and lock it again. |
| The glow has a hard circle edge. | Select the halo and set the right gradient stop to 0% Opacity. |
| My pumpkin's color disappeared when I used Draw Inside. | Draw Inside removes the fill from the shape you draw into. Undo back to before Shift+D, then Paste in Front a copy of the pumpkin and use Draw Inside on the copy. |
| My ribs make the pumpkin look gray or muddy. | The ellipses have a fill. Press A, click each rib line, and set its fill to None. |
| A curved line shows inside the stem. | That is the top of a rib ellipse. Draw the Stem rectangle after the ribs so it covers them, or select the rectangle and choose . |
| My ribs are uneven or not centered. | Delete all but the first ellipse, then use Object > Transform > Scale with Non-Uniform 55% and Copy, so every rib shares the same center and height. |
| The pumpkin looks blotchy or striped. | Delete extra Freeform points, lower their Spread, or move them farther apart. |
| The moon looks washed out. | Set the moon back to Normal in the Transparency panel. Only the halo uses Screen. |
| One object did not recolor. | Select it and click its named swatch. For a gradient, press G, double-click the stop or point that did not change, and pick the Ghost Blue swatch. |
| My JPEG is huge or tiny. | Export again with Resolution set to Screen (72 ppi). The file should be 1800 by 1200 px. |
| My file name ends in -01. | Rename the JPEG to match the turn-in name before you upload. |
| The JPEG cuts off art. | Export again with Use Artboards checked. |
| I cannot find a tool. | Tools hide in groups. Click and hold a tool that has a small triangle in its corner. |
What this project was actually about
Image Trace gives you a starting shape, not a finished one. Expanding and cleaning it is the real work: deleting what you do not need and cutting a messy edge into a clean one with Pathfinder. Global swatches turn a palette into a system, so one edit travels through the whole design. A Radial gradient makes even light from a center, and a Freeform gradient shapes light across an irregular object. Screen lets light interact with what is underneath it. You use blend modes again when you put artwork on mockups in Session 6.
Tools used
- Global swatches in the Swatches panel
- Image Trace panel: Mode, Threshold, Paths, Corners, Noise, Expand
- Ungroup Ctrl+Shift+G / Cmd+Shift+G
- Pathfinder: Minus Front and Unite
- Rectangle tool
M, Ellipse toolL, Type toolT - Lock Ctrl+2 / Cmd+2 and Send to Back
- Paste in Back Ctrl+B / Cmd+B
- Radial gradient with a 0% opacity stop
- Freeform gradient (Points, Spread) and the Gradient tool
G - Transparency panel: Screen blend mode
- (JPEG, Use Artboards, Screen 72 ppi)
- Bonus: Scatter brush and Paintbrush
B
Starter photo: Miguel Á. Padriñán, Pexels.